How to Approve or Decline Requests

As a Manager, you are responsible for validating corrections to your team's Worked Hours. Whenever a managed user submits a request, you will receive an email notification and a dashboard alert to ensure prompt review. There are two primary ways to respond to a user’s request: directly from the Timesheet table or via the centralized Addendum page Method 1: Reviewing from the Timesheet Table  This method is ideal for reviewing requests while looking at an individual’s daily performance.  1. From the header, click the Timesheet button. 2.Look for entries with Italicized Work Time and a pencil icon, which indicates a "Pending" Addendum status. 3. Open the Correct Menu. Hover over the Work Time until the Kebab Menu (three dots) appears. Depending on the request type, select the appropriate option:
  • Select View/Edit Summary for Addendum requests. 
  • Select View Work Logs for Work Log requests. 
  • Select View Idle Logs for Idle Log deletion requests. 
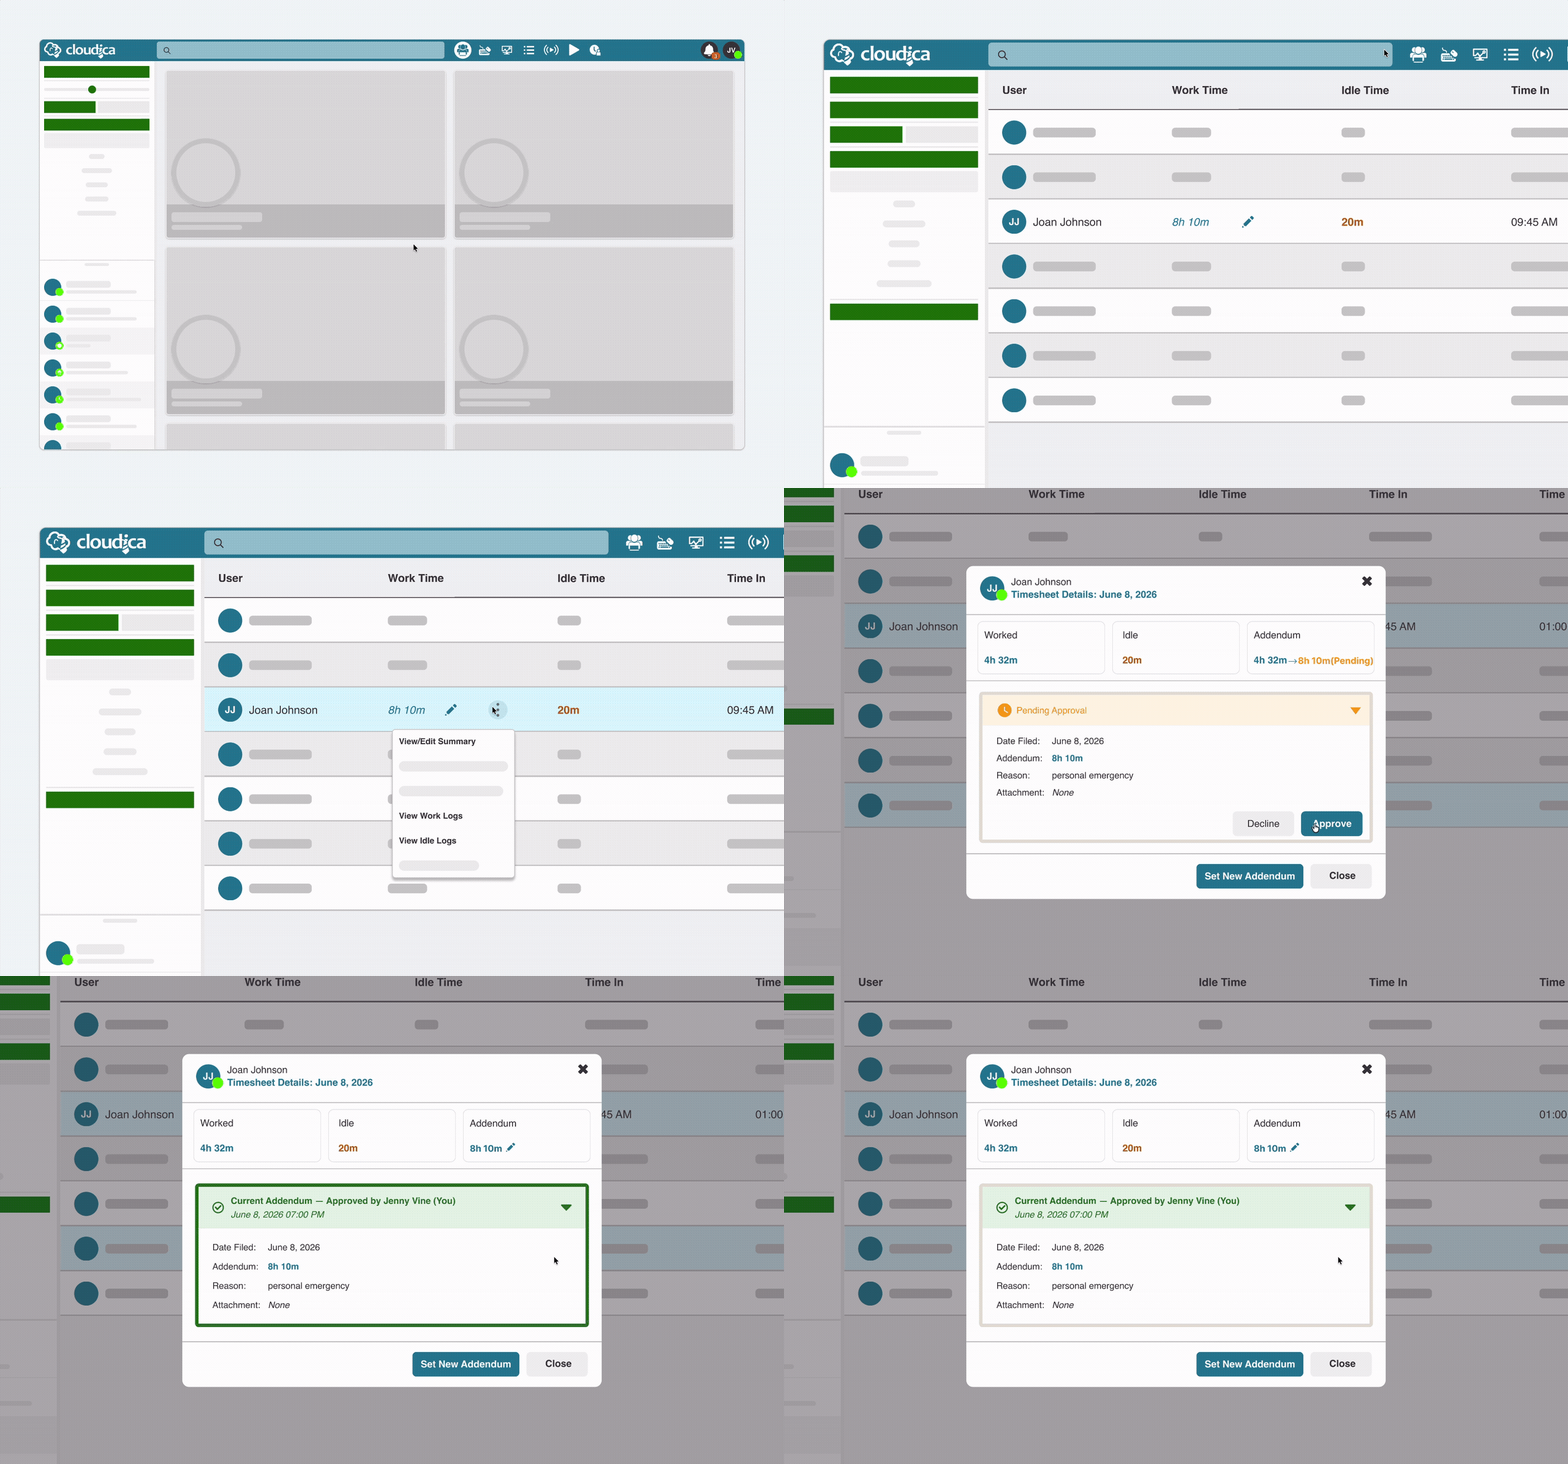
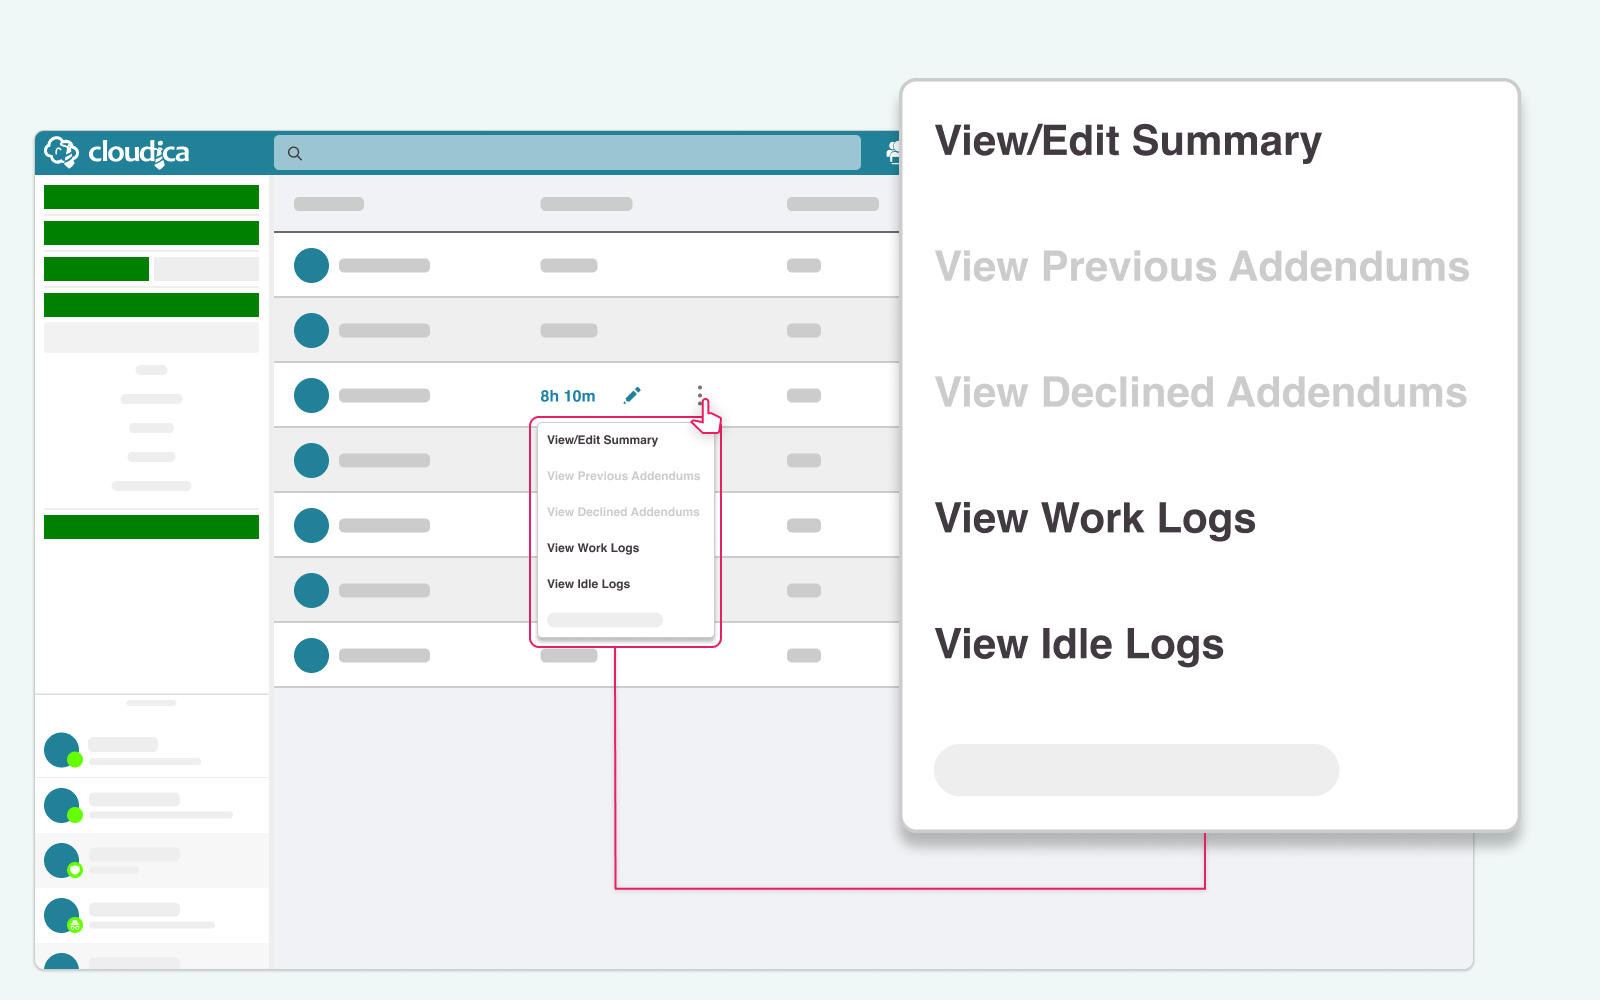
4. In the pop-down or pop-up window that appears, review the details and click either the Approve or Decline button. 6a3de532a1236Reviewing from the Timesheet Table.gif Use the User Search bar or the Team Filter to quickly locate specific employees or groups.   The Timesheet Menu provides granular control over logs and request management. To access these, hover over a user’s Work Time in the Timesheet table and click the Kebab Menu (three dots).  Detailed Timesheet Menu Options 6a3de55ab3470Detailed Timesheet Menu Options.png
  • View/Edit Summary Displays the user's daily Worked Time vs. Idle Time and any existing addendum requests. From this view, you can manually add an addendum or review, approve, or decline a user's pending request. 
  • View Previous Addendums Opens a pop-up listing all Superseded addendums for that specific date. This option is disabled if only one approved addendum exists. 
  • View Declined Addendums Displays a history of rejected requests for that date. This option is disabled if no declined addendums currently exist for that day. 
  • View Work Logs Displays specific "Time In" and "Time Out" stamps. From here, you can manually add reference logs or approve/decline a user's pending Work Log request. 
  • View Idle Logs Displays all recorded idle periods and allows you to manually delete idle time entries. From this menu, you can also approve or decline a user's pending Idle Deletion request. 
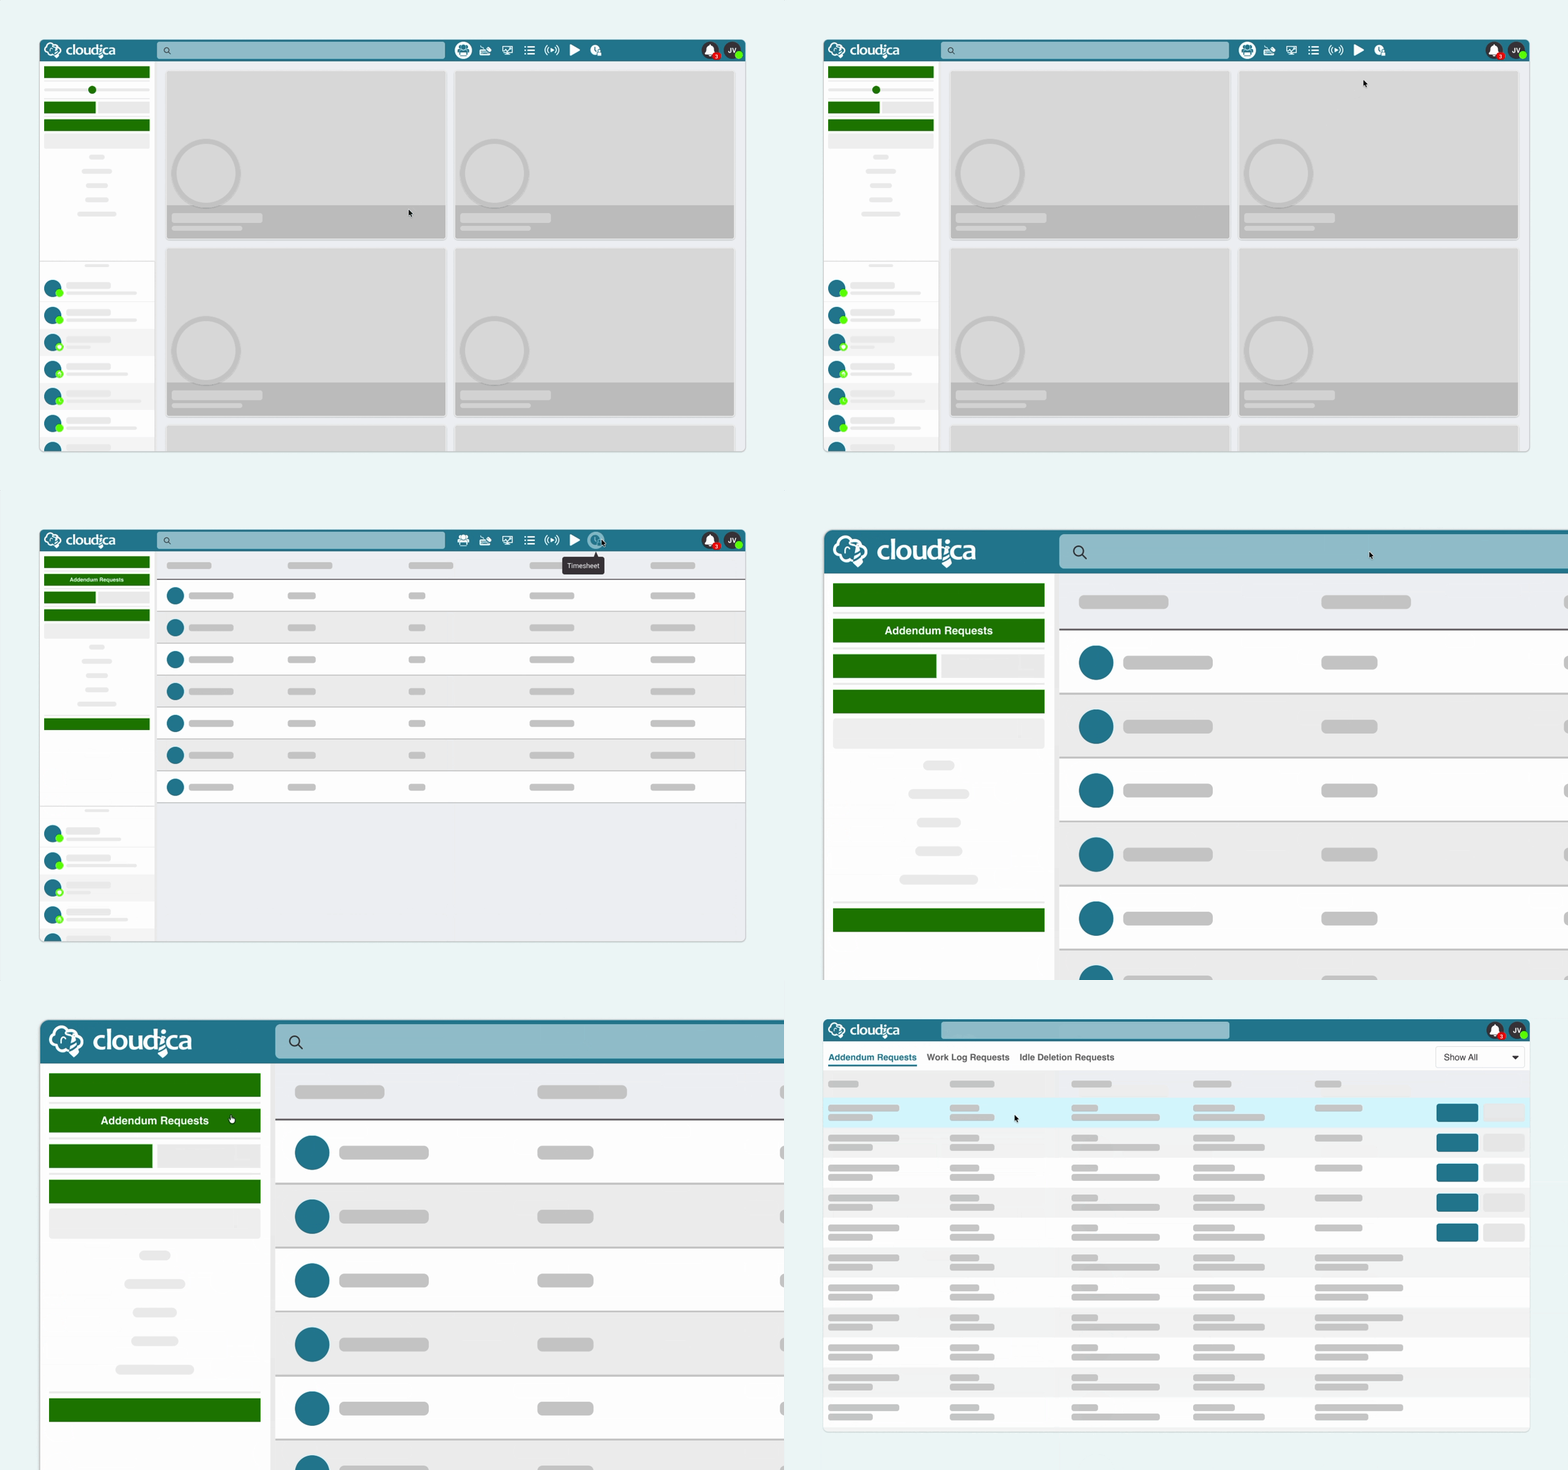
Method 2: Reviewing from the Addendum Page  This method is best for managing high volumes of requests across your entire team in one place. Accessing the Requests Page 
  • Click the Timesheet button in the top header. 
  • On the left panel, select Addendum Request
6a3dd9379b8a9reviewing from the addendum page.gif You will see three tabs: Addendum Requests, Work Log Requests, and Idle Deletion Requests. 1. Managing Addendum Requests The Addendum Request table is used to correct official work hours.
  • Click the row to open a pop-up with full details and attachments. 
  • Action: Click Approve or Decline directly on the right side of the row, or select the buttons within the details pop-up. 
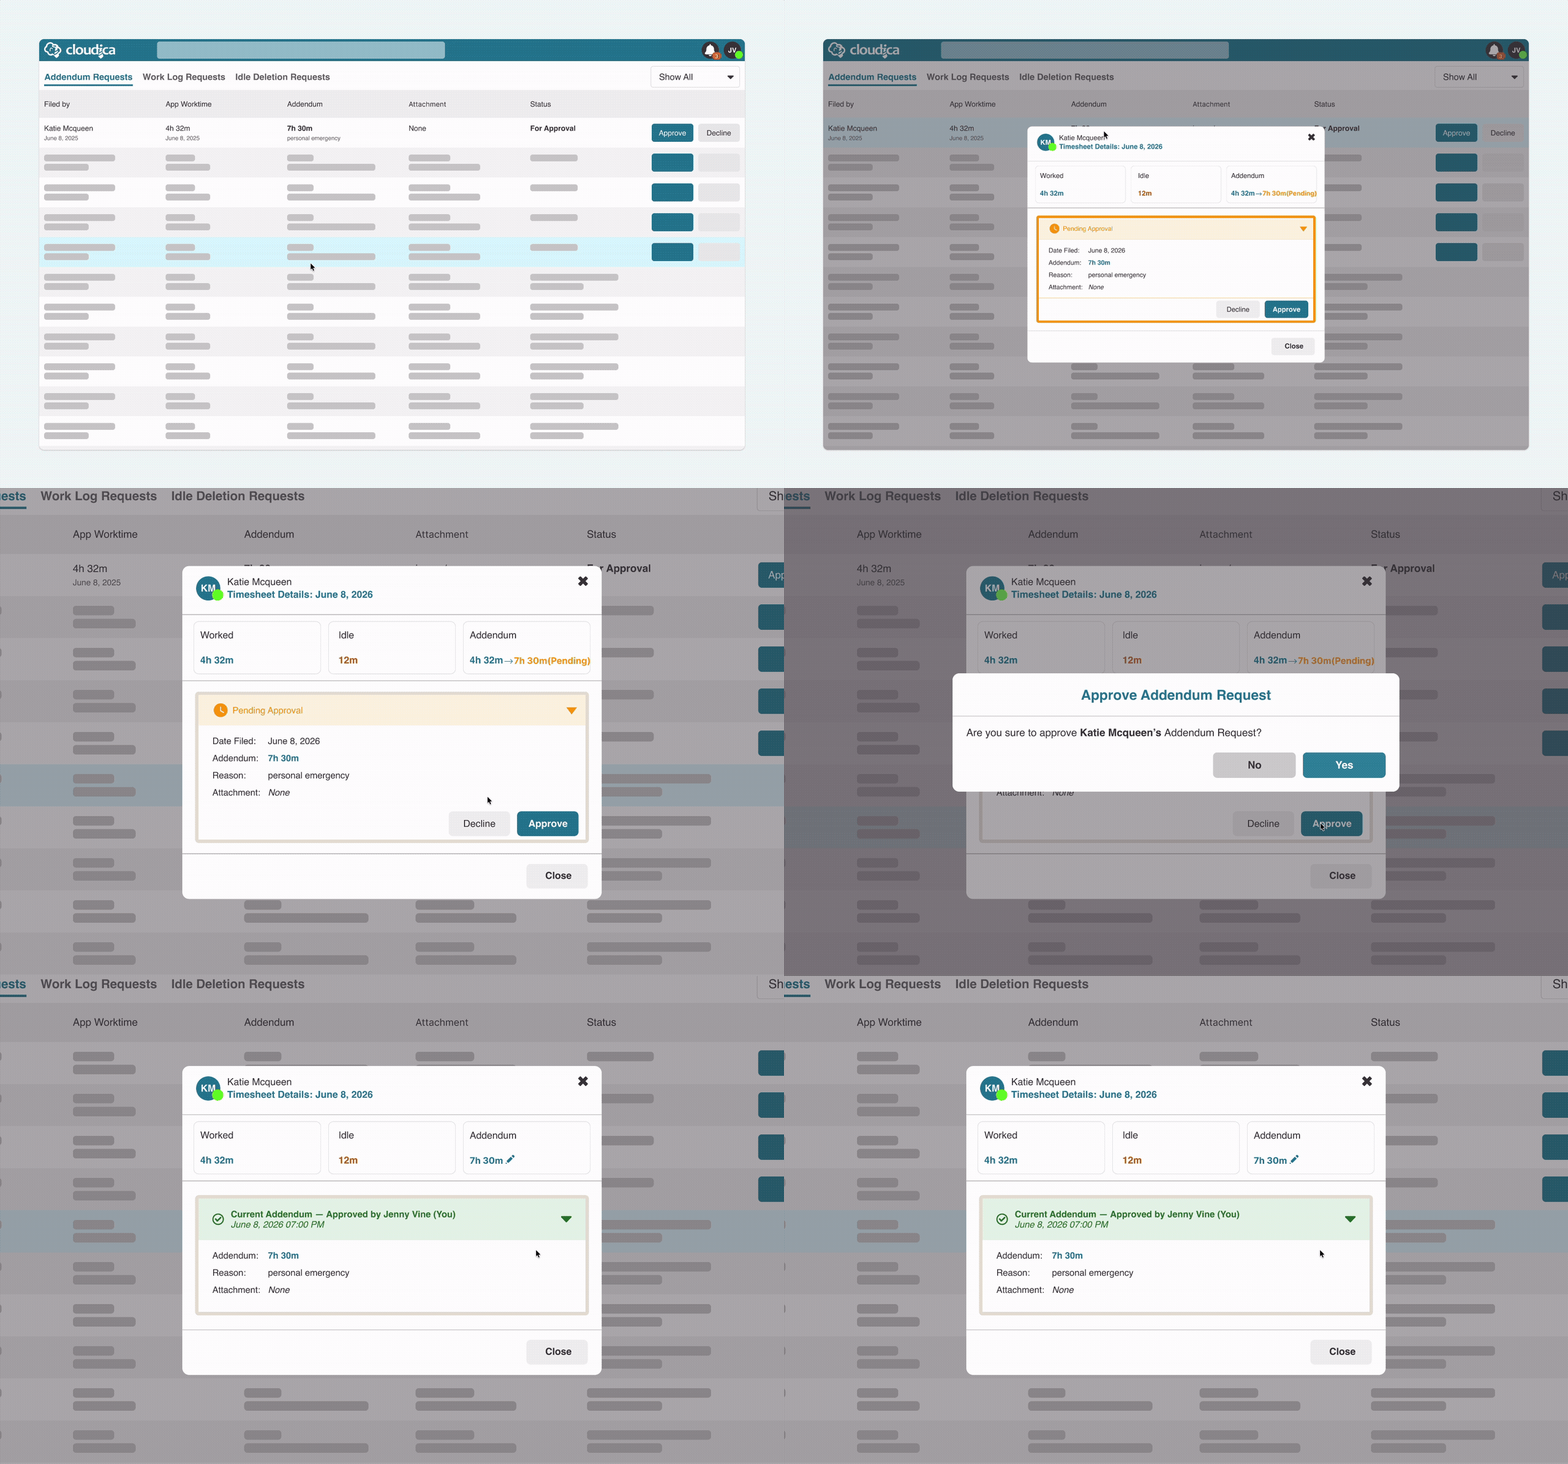
6a3de6951a646addendum request table.gif Once approved, the user’s total work hours are updated. This approval is a prerequisite for Work Log requests.  2. Managing Work Log Requests  Work Logs act as a reference for offline activity (e.g., app crashes or late arrivals).  Prerequisite: A user can only submit a Work Log request after they have an approved Addendum for that specific dat
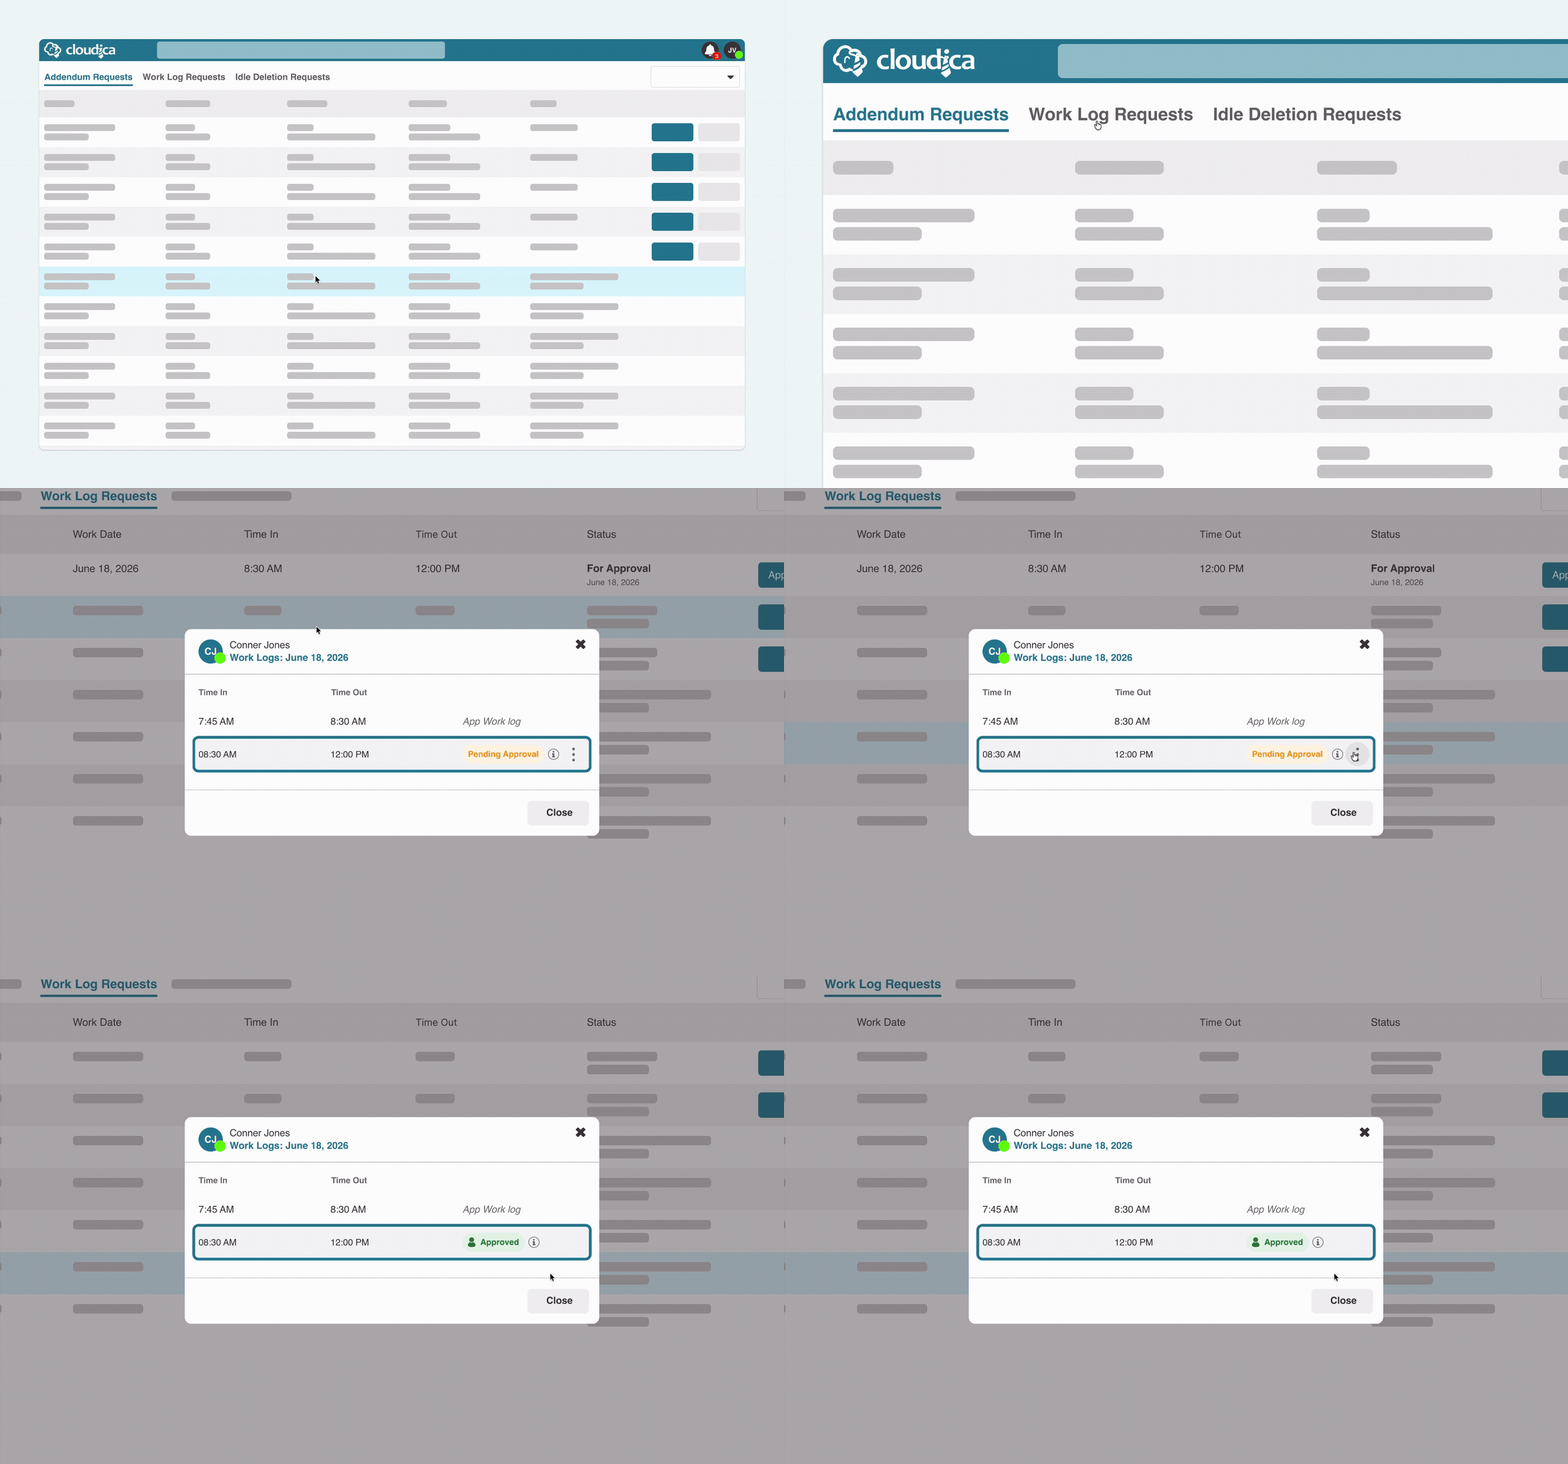
  • Click the Work Log Requests tab. 
  • Action: You can approve or decline in two ways: 
  • Directly on the row: Click Approve or Decline on the right side of the table entry. 
  • Within the details pop-up: Click the row to open the details, click the Kebab Menu (three dots), and select Approve or Decline
6a3de7da91a2dManaging Work Log Requests.gif Note: Work Logs are for reference only and do not automatically change final payroll totals.  3. Managing Idle Deletion Requests Users may request to delete idle periods if they were working away from the computer. 
  • Directly on the row: Click Approve or Decline on the right side of the table entry. 
  • Within the details pop-up: Click the row to open the details, click the Kebab Menu (three dots), and select Approve or Decline.
  • Click the Idle Deletion Requests tab. 
  • Action: You can approve or decline in two ways: 
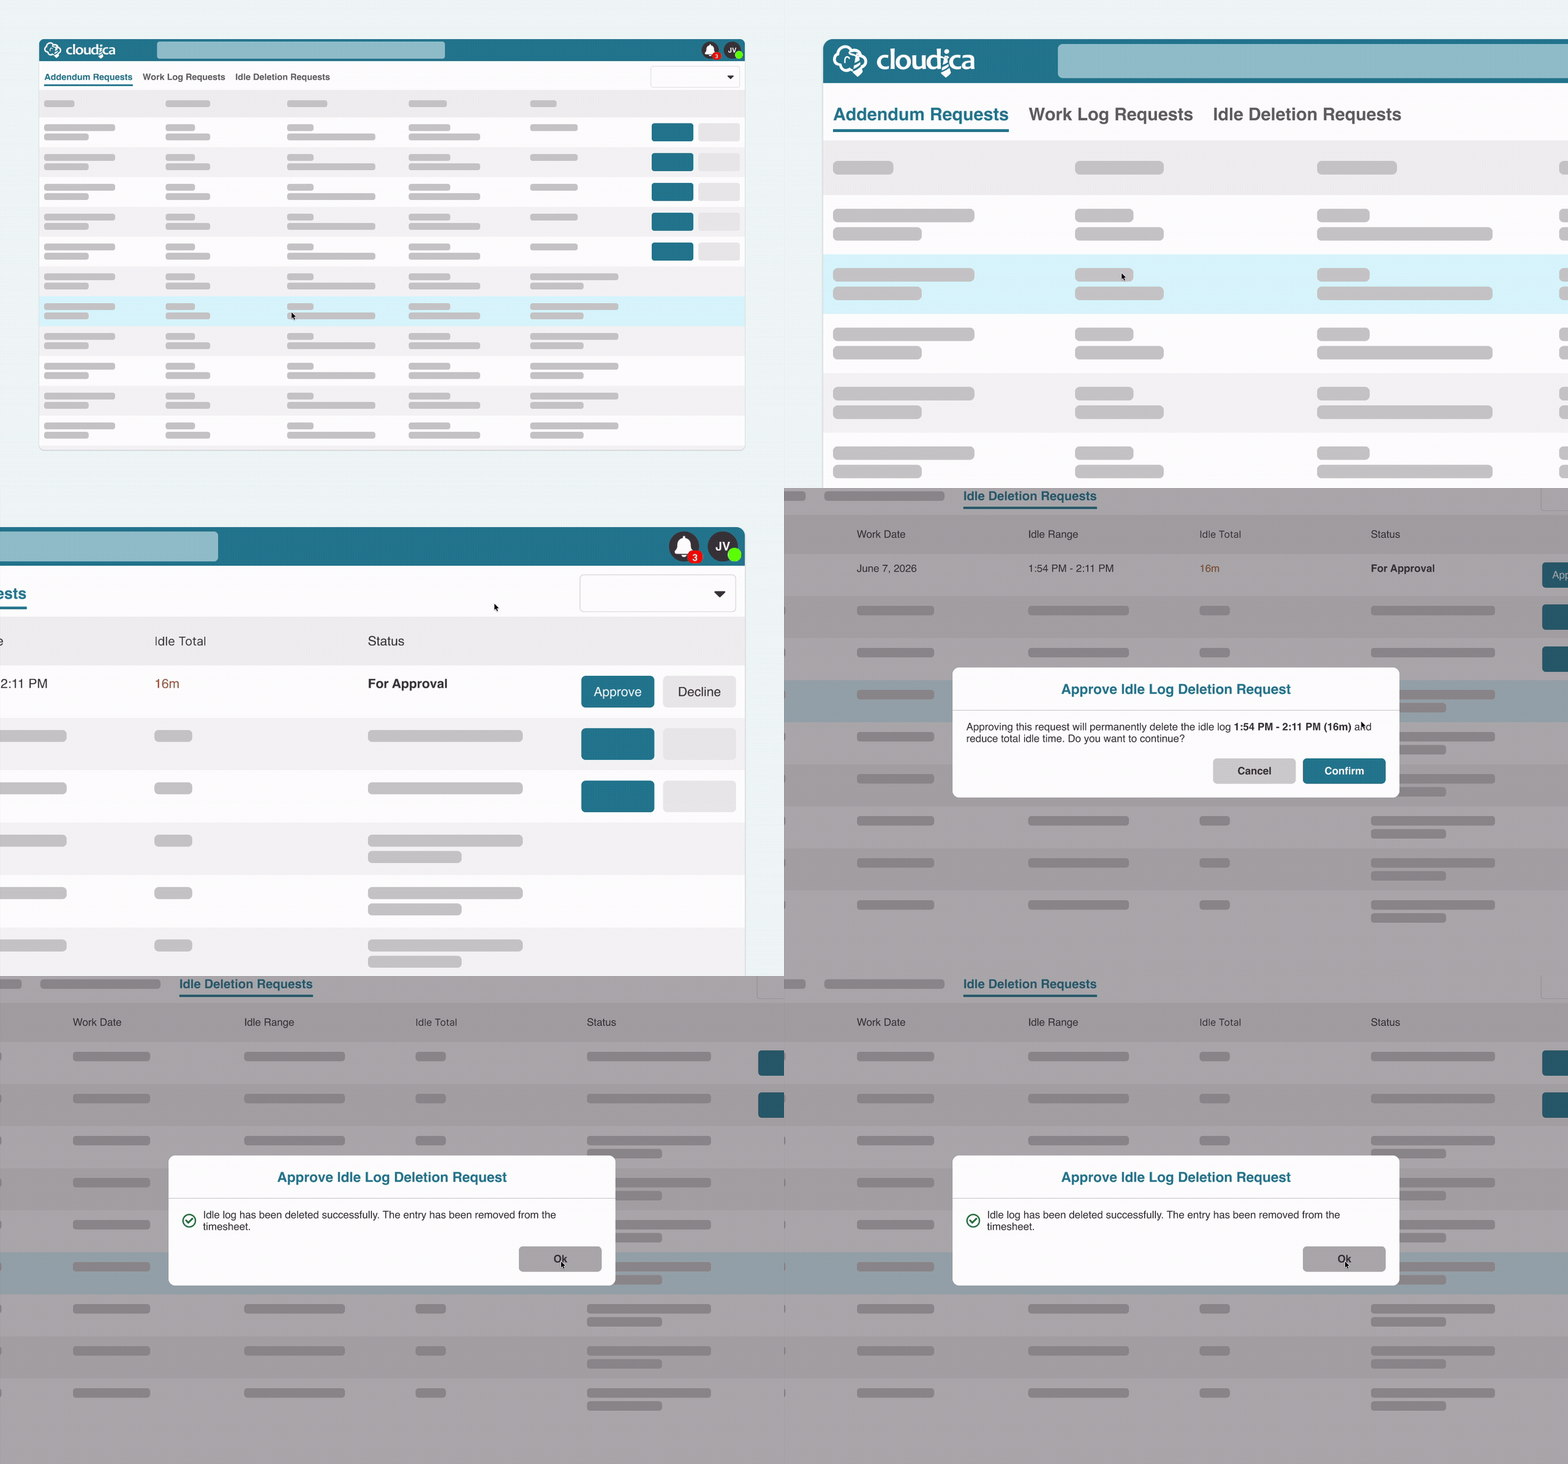
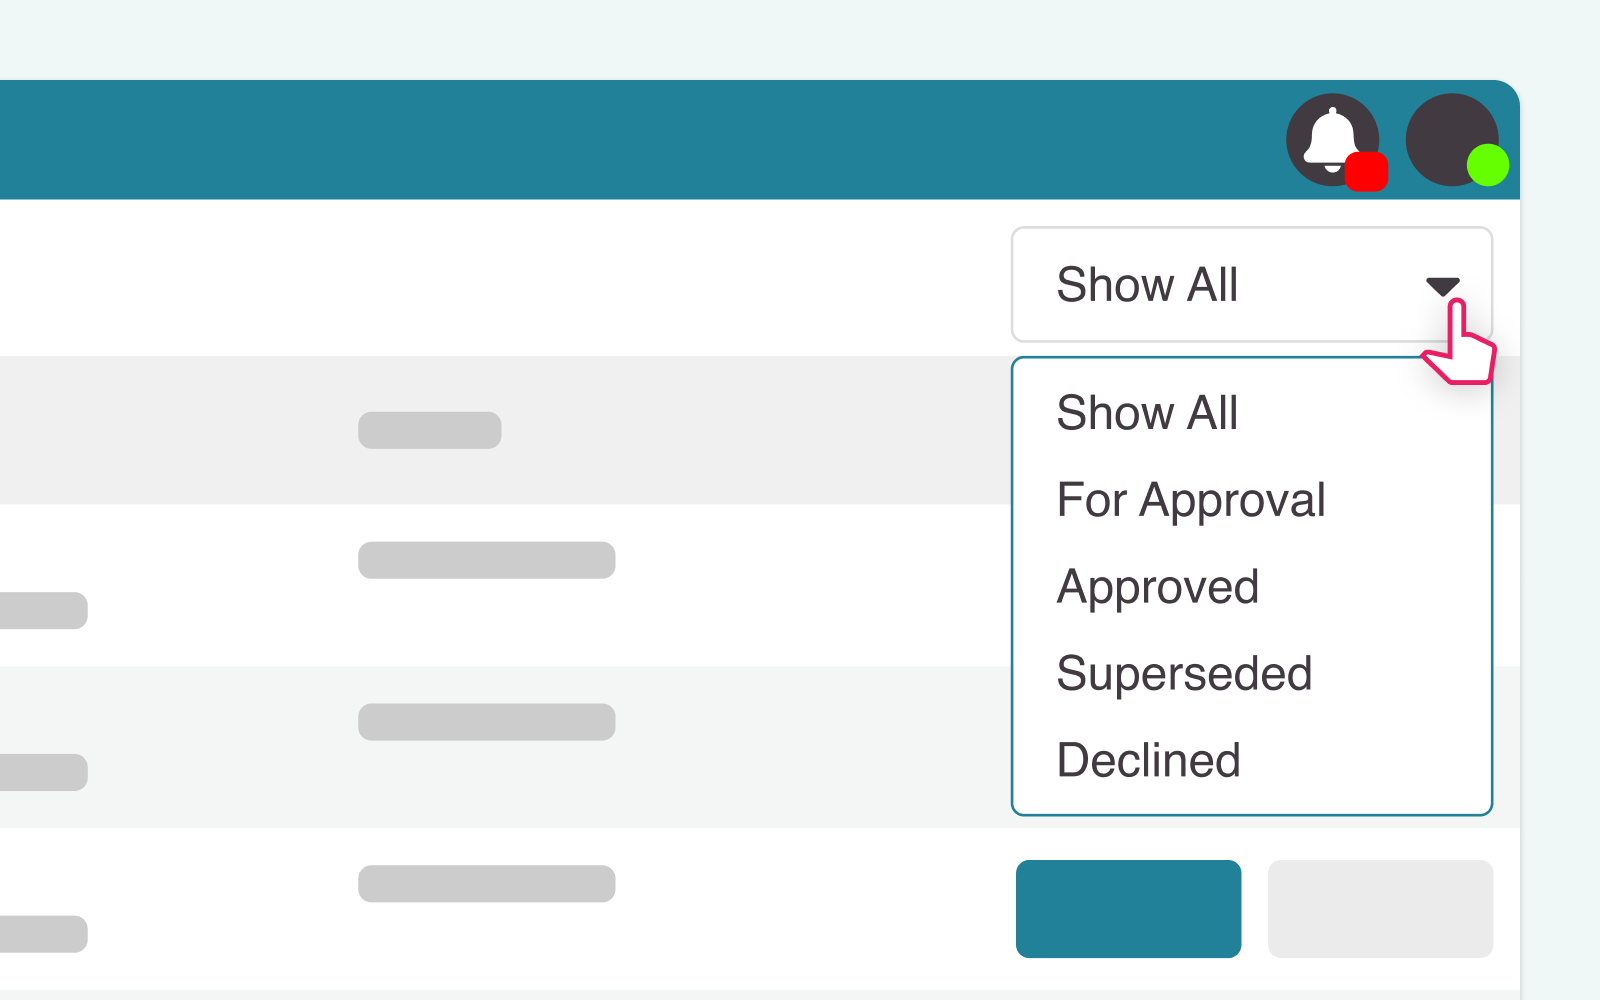
6a3de7f74e222Managing Idle Deletion Requests.gif Upon approval, the system updates the user’s Total Idle Time for that day. Efficiency & Filtering  To manage requests quickly, click the Filter button on the right side of the page to sort by status: 
  • Show All 
  • For Approval 
  • Approved 
  • Declined 
  • Superseded 
6a3de87d21996Filtering.png Why These Features Matter
  • Payroll Integrity: Ensures accurate pay for time worked during disruptions. 
  • Transparency: Centralizes evidence and reasons for audit purposes. 
  • Accountability: Maintains a formal approval trail for all manual adjustments.
Related articles How to Add an Addendum How to Add Work Logs How to Delete Idle Logs  How to Request an Addendum Manager’s Application Dashboard Quick Guide
Copyright © 2025 Cloudica LLC